How to Add a Staff Member to Multiple Schools in openSIS
In openSIS, administrators can assign staff members to multiple schools, allowing them to manage their duties across different institutions. Follow these simple steps to add a staff member to multiple schools.
Step-by-Step Instructions:
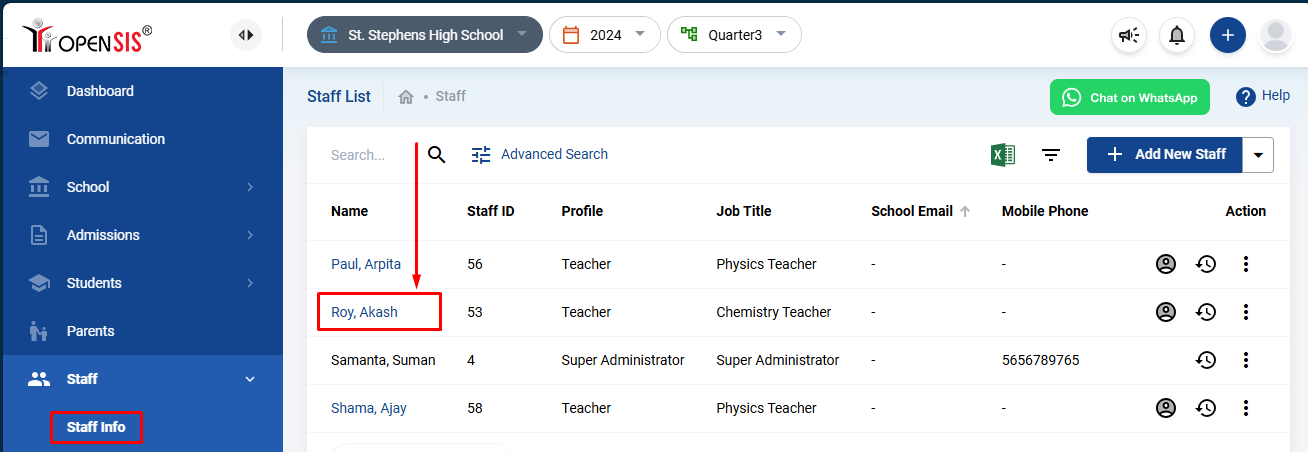
Access Staff Information:
- From the navigation menu, go to Staff and then click on Staff Info.
- You will be taken to a page listing all the staff members registered in the current school.
Select the Staff Member:
- From the list, click on the name of the staff member you wish to assign to multiple schools. This will open their staff profile page.
- From the list, click on the name of the staff member you wish to assign to multiple schools. This will open their staff profile page.
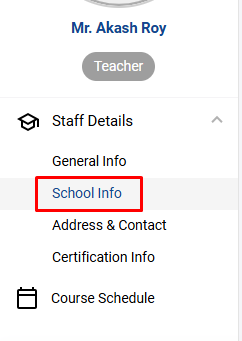
Navigate to School Info:
- On the left-hand side of the staff profile, you will see a panel titled Staff Details. In this panel, click on School Info.
- This will show the staff member's current school assignment and service information.
- On the left-hand side of the staff profile, you will see a panel titled Staff Details. In this panel, click on School Info.
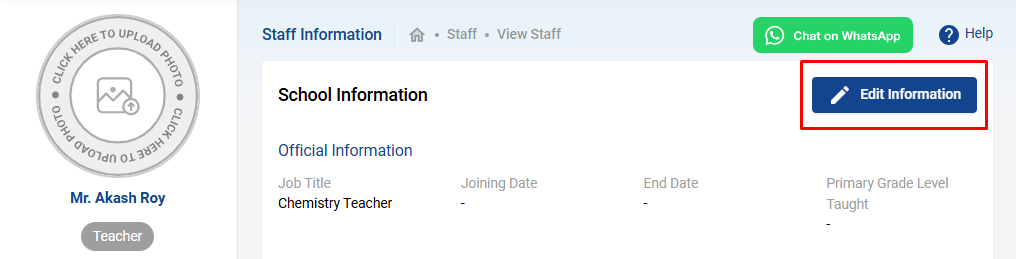
Edit Staff Information:
- To add the staff member to another school, click on the Edit Information button located in the top right corner of the page. This will enable the form in editable mode.
- To add the staff member to another school, click on the Edit Information button located in the top right corner of the page. This will enable the form in editable mode.
Add School Info:
- Under the School Information section, look for the Add School Info button and click it. A new row will appear, allowing you to enter additional school details.
- Under the School Information section, look for the Add School Info button and click it. A new row will appear, allowing you to enter additional school details.
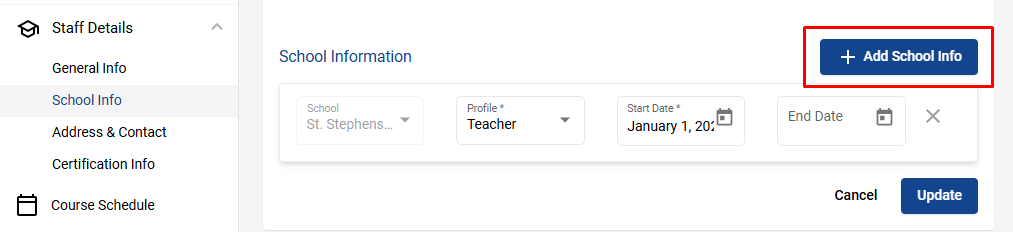
Fill in New School Details:
- Select the school in which the staff member will also work from the dropdown menu.
- Specify the staff member’s role or profile of work at that school.
- Enter the start date for the staff member's assignment to the new school.

Save the Changes:
- Once you’ve filled out the necessary details, click on Update to save the changes.
- Once you’ve filled out the necessary details, click on Update to save the changes.
Your staff member is now successfully assigned to multiple schools. This allows you to manage their work and responsibilities across various locations without creating multiple profiles.
Assigning a staff member to multiple schools is especially useful for administrators managing staff who work in different locations or have responsibilities spanning more than one institution. With openSIS, this process is made seamless, ensuring all school information is centralized under one profile.
Related Articles
How to Enroll a Student in Multiple Schools with a Home School and Away Schools in openSIS
Managing student enrollments across multiple schools can be a complex task, but openSIS makes it easier by allowing you to designate one school as the "home school" and others as "away schools." This feature is especially useful for students ...Add a School
Overview The Add School feature allows authorized administrators to create and configure a new school within openSIS. During setup, you can define the school's general information, address, contact details, and upload the official school logo. Once a ...Set Up WASH Information for a School
Understanding WASH Information in Schools WASH stands for Water, Sanitation, and Hygiene. It's a critical component in ensuring a safe and healthy learning environment in schools. Proper WASH facilities, including clean drinking water, ...Add and Manage Mental Health Information
Overview The Mental Health Info page allows administrators to create, publish, and manage mental health awareness information within openSIS. Administrators can share educational content, wellness resources, announcements, or guidance with selected ...View and Update School Information
Overview The School Information page allows administrators to view and maintain the institution's profile in openSIS. This information is used throughout the system for school identification, communication, reports, exported documents, scheduling, ...